This post is to summarize the steps how to configure a remote connection manager tool to integrate with CyberArk PSM. In this way, you can directly RDP into target server through PSM, without logging into PVWA. Basically, this post gives you a way to launch transparent connections to target systems using a standard RDP client application.
Microsoft Remote Desktop Connection (MSTSC)
To use Microsoft standard RDP client, Microsoft Remote Desktop Connection (MSTSC), you will need to start a program with following command
- psm /u {Priv_Account_Name}@51Sectest.dev /a {PSM_Server_Name} /c PSM-RDP
For example:
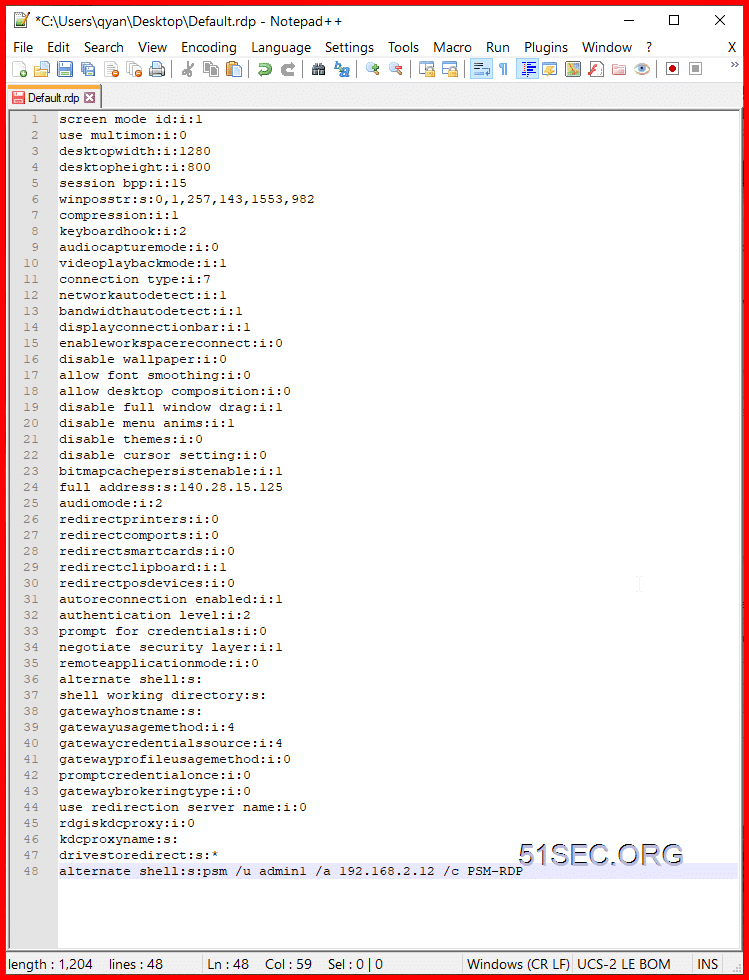
Windows 10 machines, Remote Desktop Connection might not have Program tab. Add the following line to the .rdp file: alternate shell:s:psm /u target-user /a target-address /c connection-component
Info: MSTSC has NLA enabled by default and the RDP connection will prompt a Windows Security window for authentication. To disable NLA when connecting with MSTSC, add the setting enablecredsspsupport:i:0 to one of the following files by editing the rdp file with notepad
Microsoft Remote Desktop Connection Manager
download RDCM here: https://www.microsoft.com/en-gb/download/details.aspx?id=44989
Search by google and found this link to download : https://www.scom2k7.com/downloads/rdcman.msi
To integrate RDCM with CyberArk PSM, it requires some configuration changes on RDP file object. This post lists least step you will need to follow to get RDCM working with PSM.
CyberArk KB: https://cyberark-customers.force.com/s/article/How-to-setup-Remote-Desktop-Connection-Manager
================================================
How to connect through Privileged Session Manager for Windows using Remote Desktop Connection Manager
Introduction
Remote Desktop Connection Manager (RDCM) does not have the ability to disable credsspsupport and therefore you will be asked for credentials before the connection to the PSM is established. When connecting with an LDAP user this does not matter as it be able to automatically authenticate with these domain credentials however you will not be able to make connections when using CyberArk and RADIUS challenge-response authentication as their credentials are different.
Step-By-Step Instructions
Ensure the following group policy parameters are applied to the PSM server.
- Always prompt for password upon connection – Disabled
- Require secure RPC communication – Enabled (this should already be enabled as part of hardening.
- Require use of specific security layer for remote (RDP) connections – Enabled – Set to RDP.
You should now be able to use RADIUS challenge-response and CyberArk authentication with RDCM.
===============================================================
Give each entry a meaningful name to indicate the target device details.
Populate the Server name field with the text {PSM-Server-Hostname}
Enter a friendly name of your
choice in the Display name field.
Uncheck the Inherit from parent checkbox.
Populate the Start program field with this string as
shown in the sample screenshot below:
/c PSM-RDP
of the privileged account as defined in CyberArk; ie. MyUsernameAdmin
the destination server name as resolvable via DNS; ie.
PrintServer
1 4 Configure the Logon Credentials tab as
shown in the sample screenshot below:
Uncheck the Inherit from parent checkbox
Enter your non-privileged AD account
username in the User name field
Enter the text 51Sec-ITPROSEC in the Domain
field
When you click to connect, you will enter the
password for your non-privileged AD account.
Notes: How to connect to RDP Console / admin mode:
If you choose connect to console / admin, PSM will deny the session.
PSM server will tell you “The requested session access is denied”.
-
Make a copy of the PSM-RDP connection component (lets call it PSM-RDP-ADMIN).
-
Set the “AlloweConnectToConsole” Value=Yes, Visible=Yes.
-
Add it to the desired platform
-
In RDP client where you specify the psm /u etc.. commands, change the /c to PSM-RDP-ADMIN
There is no “admin connect” in current version of MS-Windows after server 2003:
For 2003 or Windows XP you would need a custom connection component with mstc.exe /admin or mstc.exe /console as the command.
MobaXterm
MobaXterm also support PSM well. Here are all configuration steps in the screenshot.
Most important step is to configure Remote command “psm /u [email protected] /a 192.168.2.12 /c PSM-RDP“
Create a domain user account and save it into credential list.
mRemoteNG
Remote Desktop Manager Free Edition – Devolutions
How it is working for Devolutions RDM integrating with CyberArk PAM solution:
Below is an example diagram demonstrating how Remote Desktop Manager integrates with CyberArk’s PAM Solution

- The end-user attempts to access a privileged remote connection through RDM.
- RDM confirms that the end user’s certificate is valid.
- RDM connects to CyberArk and requests the necessary credentials.
- CyberArk accepts the request and sends the credentials to RDM.
- The credentials are used to grant the end-user access, so they can complete their work-related task.
At no point in this process does the end-user see the credentials!
PSM Integration
192.168.2.25 is PSM server ip address.
Here is the magic string:


