February 29, 2024

Proton VPN Free vs. Premium: Which Plan Is Best For You?

Proton VPN Free vs. Premium: Which Plan Is Best For You?

VPNs provide a secure way to send internet traffic through an encrypted tunnel. This keeps browsing data safe, even over public or untrusted internet connections. As a Swiss VPN provider, Proton VPN adheres to high privacy standards. As such, it does not log user activity or share data with third parties. Its anonymous VPN service keeps browsing histories private and enables internet usage without surveillance.

Given its trustworthy security reputation, you may be wondering how the free version measures up. In some cases, free VPNs lack the security features offered in paid plans. In the case of Proton VPN, we compare the free version to its premium version known as Proton VPN Plus.

Proton VPN Free vs. Proton VPN Plus: Comparison

Features Free Proton VPN Plus
($6.49 per month for one year)
Number of servers and countries 86 servers in 3 countries 3,000 servers in 65 countries
Kill switch Yes Yes
# of simultaneous connections 1 10
Malware and ad blocker No Yes
Streaming and torrenting No Yes
Unlimited data Yes Yes
Speed Medium Fast

For a more in-depth analysis, read our full review of Proton VPN.

Feature comparison: Proton VPN Free vs. Proton VPN Plus

Number of servers

Figure A

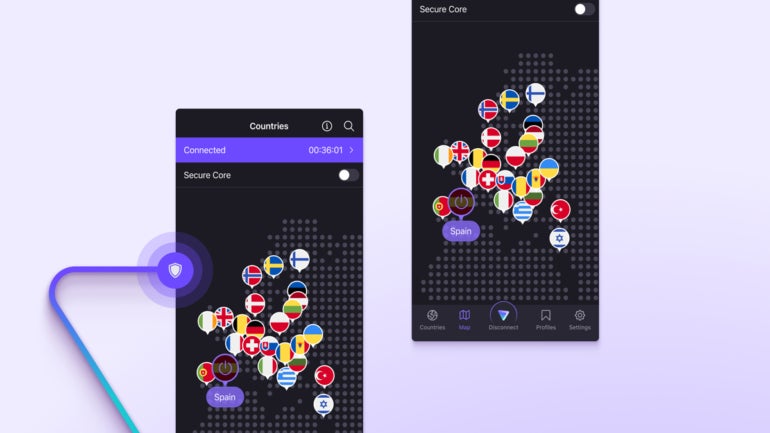
Proton VPN servers.
Proton VPN servers. Image: Proton

Proton VPN Free provides free access to 86 servers from the U.S., Netherlands and Japan. This may be enough for many users. But those with more rigorous requirements for speed, latency and availability may need the stronger network of Proton VPN Plus. That network offers access to 3,000+ servers in 70+ countries.

Kill switch

Figure B

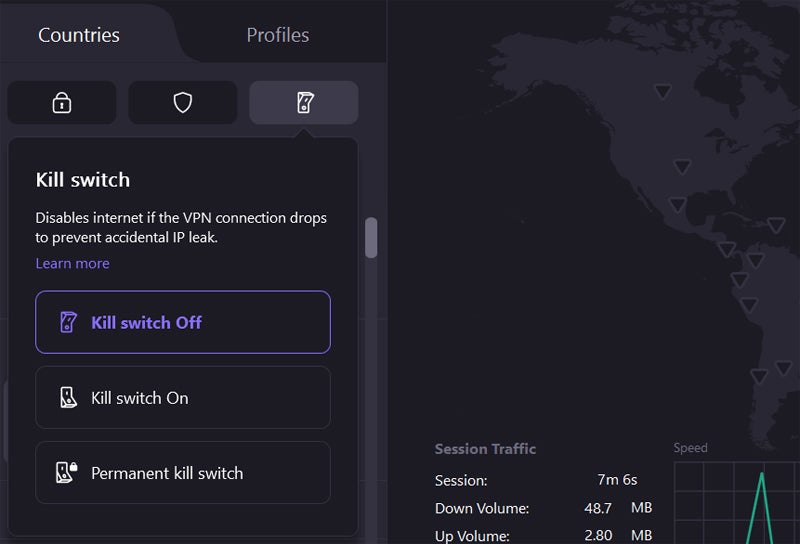
Proton VPN kill switch.
Proton VPN kill switch. Image: Luis Millares

Both versions of Proton VPN come with a kill switch. It acts as a last line of defense. If the user experiences an outage or some other disruption and the VPN connection fails, the kill switch automatically stops a machine from reconnecting to the internet without the VPN’s protection. This is a good way to prevent unwanted sharing of data.

Simultaneous connections

The free version limits a user to only one connection at a time. Those opting for Proton VPN Plus can open up to 10 simultaneous connections. One may well be enough for many users, but those with more sophisticated needs will need the premium version.

Malware and ad blocker

Malware and adware are common problems in the modern internet. Proton VPN Plus provides both functions courtesy of the NetShield ad blocker which uses DNS filtering to safeguard users against malware and website trackers. The free version does not include those features.

Streaming and torrenting

Streaming has become commonplace as a way to instantly view content. Torrenting, however, requires the entire file to be downloaded before anything can be viewed. But, it is fast and often used to share videos, music and images. Proton VPN Plus supports both streaming and torrenting whereas the free version does not.

Unlimited data

Both versions have no restrictions when it comes to the quantity of data that can be shared over the VPN.

Speed

The free version of Proton VPN is reasonably fast. The company characterizes its rate of speed as medium whereas the speed of Proton VPN Plus is rated as fast. Accelerator features are said to be able to increase VPN data transfer rates by as much as 400%

Proton VPN Free pros and cons

Pros of Proton VPN Free

  • Unlimited data over one connection.
  • Kill switch prevents unwanted transmission of data due to an outage.
  • Good set of privacy and security features built in.

Cons of Proton VPN Free

  • Only provides one VPN connection at a time.
  • Lacks malware/ad blocking.
  • Limited number of servers and countries plus lower speed may not offer sufficient performance for some users.

Proton VPN Plus pros and cons

Pros of Proton VPN Plus

  • Up to 10 simultaneous connections.
  • Faster speeds and far greater number of servers and countries available.
  • Advanced features include malware/ad blocking, streaming and torrenting.

Cons of Proton VPN Plus

  • At around $6 per month per user, Proton VPN is more expensive than many competitive offerings.
  • Proton VPN Plus may be overkill for those who don’t require a high degree of privacy of data or don’t deal in sensitive information on a regular basis.

Methodology

This assessment of Proton VPN Free and Proton VPN Plus is based on expert evaluation of these tools as well as user reviews. For more information, read our full review of Proton VPN.

Should your organization use Proton VPN Free or Proton VPN Premium?

Proton VPN is designed for those demanding the highest standards in privacy, security and confidentiality. Developed in accordance with strict Swiss laws for privacy, either version can be counted on to keep your data secure and to prevent unwanted outsiders listening in or intercepting any content. That said, the free version has definite limitations. It may be fine for a user who makes occasional VPN transmissions that need to be kept private and that don’t require the highest levels of performance.

Proton VPN Plus is the best option when more than one VPN connection is likely to be needed and when a user needs great performance across the globe. As such, the premium version’s ability to access 3,000+ servers in 70+ countries (compared to 86 servers in only three nations) as well as its higher overall performance, speed accelerators, torrenting and streaming capabilities and malware/ad blocking, make it a better choice for demanding VPN users.

Source link

Proton VPN Free vs. Premium: Which Plan Is Best For You? Read More »

Brain surgery training from an avatar

Brain surgery training from an avatar

Benjamin Warf, a renowned neurosurgeon at Boston Children’s Hospital, stands in the MIT.nano Immersion Lab. More than 3,000 miles away, his virtual avatar stands next to Matheus Vasconcelos in Brazil as the resident practices delicate surgery on a doll-like model of a baby’s brain.

With a pair of virtual-reality goggles, Vasconcelos is able to watch Warf’s avatar demonstrate a brain surgery procedure before replicating the technique himself and while asking questions of Warf’s digital twin.

“It’s an almost out-of-body experience,” Warf says of watching his avatar interact with the residents. “Maybe it’s how it feels to have an identical twin?”

And that’s the goal: Warf’s digital twin bridged the distance, allowing him to be functionally in two places at once. “It was my first training using this model, and it had excellent performance,” says Vasconcelos, a neurosurgery resident at Santa Casa de São Paulo School of Medical Sciences in São Paulo, Brazil. “As a resident, I now feel more confident and comfortable applying the technique in a real patient under the guidance of a professor.”

Warf’s avatar arrived via a new project launched by medical simulator and augmented reality (AR) company EDUCSIM. The company is part of the 2023 cohort of START.nano, MIT.nano’s deep-tech accelerator that offers early-stage startups discounted access to MIT.nano’s laboratories.

In March 2023, Giselle Coelho, EDUCSIM’s scientific director and a pediatric neurosurgeon at Santa Casa de São Paulo and Sabará Children’s Hospital, began working with technical staff in the MIT.nano Immersion Lab to create Warf’s avatar. By November, the avatar was training future surgeons like Vasconcelos.

“I had this idea to create the avatar of Dr. Warf as a proof of concept, and asked, ‘What would be the place in the world where they are working on technologies like that?’” Coelho says. “Then I found MIT.nano.”

Capturing a Surgeon

As a neurosurgery resident, Coelho was so frustrated by the lack of practical training options for complex surgeries that she built her own model of a baby brain. The physical model contains all the structures of the brain and can even bleed, “simulating all the steps of a surgery, from incision to skin closure,” she says.

She soon found that simulators and virtual reality (VR) demonstrations reduced the learning curve for her own residents. Coelho launched EDUCSIM in 2017 to expand the variety and reach of the training for residents and experts looking to learn new techniques.

Those techniques include a procedure to treat infant hydrocephalus that was pioneered by Warf, the director of neonatal and congenital neurosurgery at Boston Children’s Hospital. Coelho had learned the technique directly from Warf and thought his avatar might be the way for surgeons who couldn’t travel to Boston to benefit from his expertise.

To create the avatar, Coelho worked with Talis Reks, the AR/VR/gaming/big data IT technologist in the Immersion Lab.

“A lot of technology and hardware can be very expensive for startups to access as they start their company journey,” Reks explains. “START.nano is one way of enabling them to utilize and afford the tools and technologies we have at MIT.nano’s Immersion Lab.”

Coelho and her colleagues needed high-fidelity and high-resolution motion-capture technology, volumetric video capture, and a range of other VR/AR technologies to capture Warf’s dexterous finger motions and facial expressions. Warf visited MIT.nano on several occasions to be digitally “captured,” including performing an operation on the physical baby model while wearing special gloves and clothing embedded with sensors.

“These technologies have mostly been used for entertainment or VFX [visual effects] or CGI [computer-generated imagery],” says Reks, “But this is a unique project, because we’re applying it now for real medical practice and real learning.”

One of the biggest challenges, Reks says, was helping to develop what Coelho calls “holoportation”— transmitting the 3D, volumetric video capture of Warf in real-time over the internet so that his avatar can appear in transcontinental medical training.

The Warf avatar has synchronous and asynchronous modes. The training that Vasconcelos received was in the asynchronous mode, where residents can observe the avatar’s demonstrations and ask it questions. The answers, delivered in a variety of languages, come from AI algorithms that draw from previous research and an extensive bank of questions and answers provided by Warf.

In the synchronous mode, Warf operates his avatar from a distance in real time, Coelho says. “He could walk around the room, he could talk to me, he could orient me. It’s amazing.”

Coelho, Warf, Reks, and other team members demonstrated a combination of the modes in a second session in late December. This demo consisted of volumetric live video capture between the Immersion Lab and Brazil, spatialized and visible in real-time through AR headsets. It significantly expanded upon the previous demo, which had only streamed volumetric data in one direction through a two-dimensional display.

Powerful impacts

Warf has a long history of training desperately needed pediatric neurosurgeons around the world, most recently through his nonprofit Neurokids. Remote and simulated training has been an increasingly large part of training since the pandemic, he says, although he doesn’t feel it will ever completely replace personal hands-on instruction and collaboration.

“But if in fact one day we could have avatars, like this one from Giselle, in remote places showing people how to do things and answering questions for them, without the cost of travel, without the time cost and so forth, I think it could be really powerful,” Warf says.

The avatar project is especially important for surgeons serving remote and underserved areas like the Amazon region of Brazil, Coelho says. “This is a way to give them the same level of education that they would get in other places, and the same opportunity to be in touch with Dr. Warf.”

One baby treated for hydrocephalus at a recent Amazon clinic had traveled by boat 30 hours for the surgery, according to Coelho.

Training surgeons with the avatar, she says, “can change reality for this baby and can change the future.”
Source link

Brain surgery training from an avatar Read More »

RoboForm Free vs. Paid: Which Plan Is Best For You?

RoboForm Free vs. Paid: Which Plan Is Best For You?

RoboForm logo.
Image: RoboForm

RoboForm began as a company that dealt in form automation and autofill. It has expanded into areas such as password management. Its password manager offers a wide range of security features. They are certainly good enough for most individuals and are likely to prove adequate for many businesses, especially SMBs.

RoboForm Free vs. RoboForm Premium: Comparison

RoboForm has multiple versions for business and personal use; we’ve broken down each in our full review. But for those simply wondering whether the free version may be enough for them or if it would be better to upgrade to a premium version, let’s compare the two versions and help you decide.

Features Free Premium $1.99/month
Unlimited passwords Yes Yes
Number of devices 1 Multiple
Password generator Yes Yes
2FA Yes Yes
Cloud backup Yes Yes
Support Email Priority 24/7 email, live chat and phone support during business hours.
Secure sharing Can send individual items but no sharing of folders Secure sharing and sending of items and folders.

Feature comparison: RoboForm Free vs. RoboForm Premium

RoboForm does a good job of providing a broad range of password management functionality with all of its plans. Both its free and premium versions include features such as unlimited password storage, autofill, multi-platform support, offline access, passkey support, password generation, AES 256 encryption, password audits, export/import functions, password history, Windows application logins and master password restores. While there are similarities between these versions, there are also key differences.

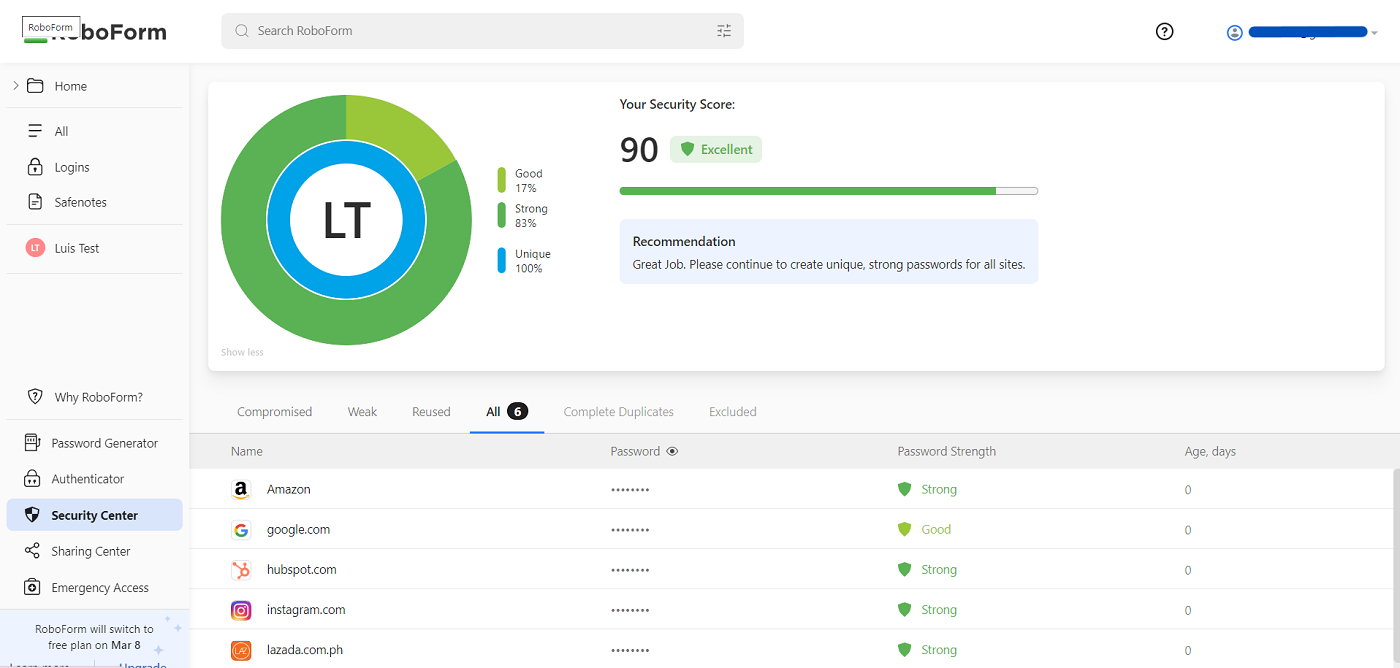
RoboForm security center.
Figure A: RoboForm security center. Image: Luis Millares

Unlimited passwords

Both the free and premium versions of RoboForm allow users to store as many passwords as they wish in the application.

Number of devices

The free version of RoboForm only allows the use of one device. RoboForm Premium allows the use of multiple devices from one password manager, which makes life far easier for a user who hops from laptop to smartphone to tablet many times a day. Thus, the free version should only be favored by those happy to stick to one device.

Password generator

All versions come with a built-in password generator that can create strong, unique passwords whenever you sign up for a new account.

Two-factor authentication

2FA is available on all versions. If a password is compromised, therefore, the hacker still can’t access the account or application unless they possess an additional authentication method such as a code or biometric input.

Cloud backup

RoboForm backs up account data securely for easy restoration from any device, either locally or in the cloud. If the user loses access, this feature provides a way to retrieve valuable passwords and other items stored on the application. Both versions provide this feature.

Support

The free version of RoboForm comes with only basic email support. But don’t expect a response within 24 hours. The premium versions provide email responses within 24 hours as well as phone support from 9-5 Monday to Friday EST.

Secure sharing

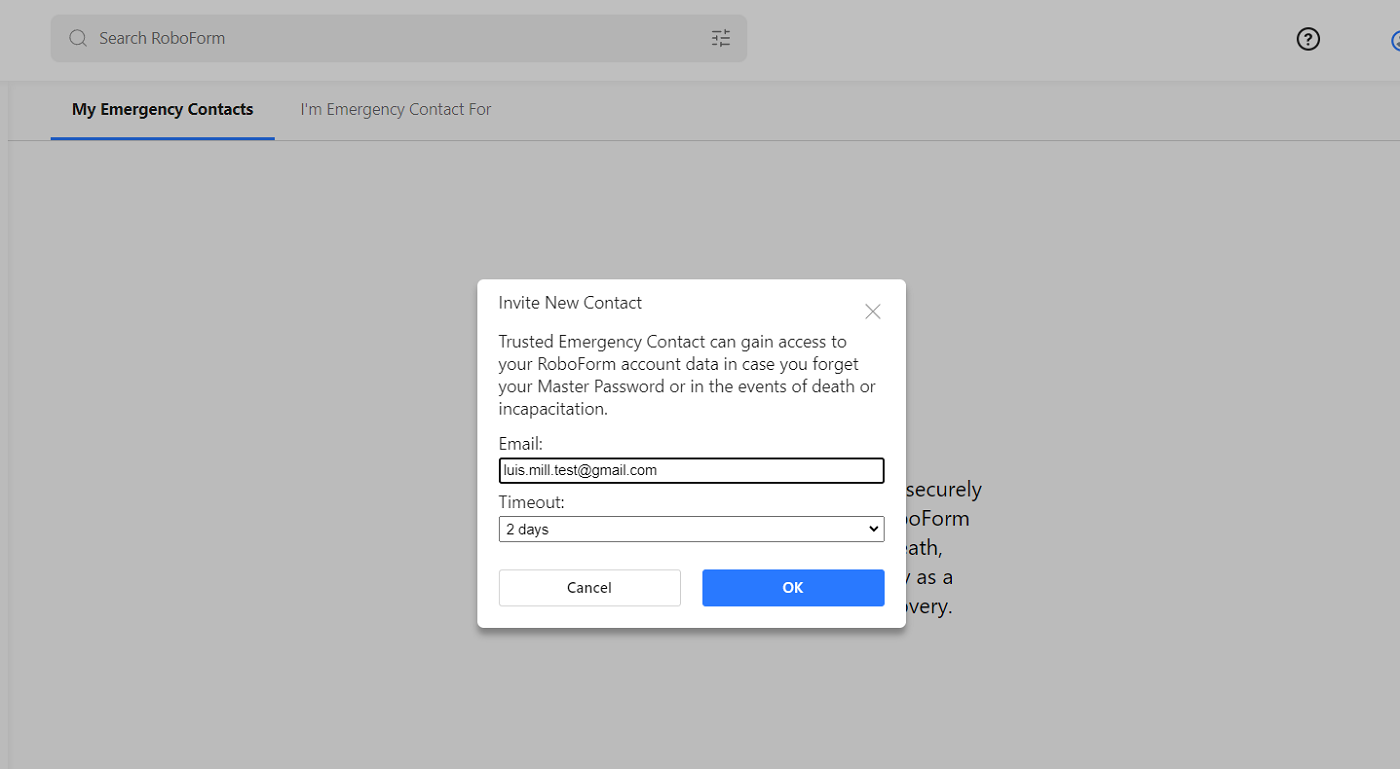
RoboForm emergency contact option.
Figure B: RoboForm emergency contact option. Image: Luis Millares

The free version of RoboForm has limited data sharing capabilities. A user can securely send items using the application such as passwords and financial information. However, the Premium plan provides the ability to securely share and send data.

RoboForm Free pros and cons

Pros of RoboForm Free

  • Unlimited password storage enables a user to store as many passwords to as many sites as they wish on one device.
  • Includes a raft of security features also found on the premium version, such as autofill, multi-platform support, offline access, passkey support, password generation, encryption, password history and master password restores.
  • Cloud backup is provided as well as master password restore.

Cons of RoboForm Free

  • Only usable on one device.
  • Support options are limited to a relatively slow email response line.
  • Users can only securely send information but not share it more broadly.

RoboForm Premium pros and cons

Pros of RoboForm Premium

  • Unlimited password storage managed centrally across multiple devices.
  • Secure sharing and sending of items and folders with no restrictions.
  • Good support courtesy of a 9-5 EST phone line Monday to Friday and 24-hour email response.

Cons of RoboForm Premium

  • Allows users to set passwords that are weaker than those allowed on some other password managers.
  • Lacks some of the security features found in password managers that are aimed at secure business environments.

Methodology

We assessed the pros and cons of RoboForm Premium and RoboForm Free based on expert evaluation and user reviews. For more information, read our full review of RoboForm.

Should your organization use RoboForm Free or RoboForm Premium?

RoboForm does a better job than some other competitive offerings in including core security functions in its free password manager version. As such, it is a good option for users who need basic password management capabilities. That said, RoboForm Free does offer an adequate range of bells and whistles. It is limited in that it can only be used on one device. Nevertheless, anyone happy to operate on only one device will find it a good choice in most cases as it can store unlimited numbers of passwords. RoboForm Premium is the one to choose for users operating on more than one device. It also provides a few more sophisticated features that business users may need. It is also better supported. Both make sense for specific use cases, but RoboForm Premium is probably going to be chosen by most users in today’s age of multiple-device ownership.

Source link

RoboForm Free vs. Paid: Which Plan Is Best For You? Read More »

Free DNS Hosting Provider ClouDNS to Integrate with Cloudflare and Google Site

Free DNS Hosting Provider ClouDNS to Integrate with Cloudflare and Google Site

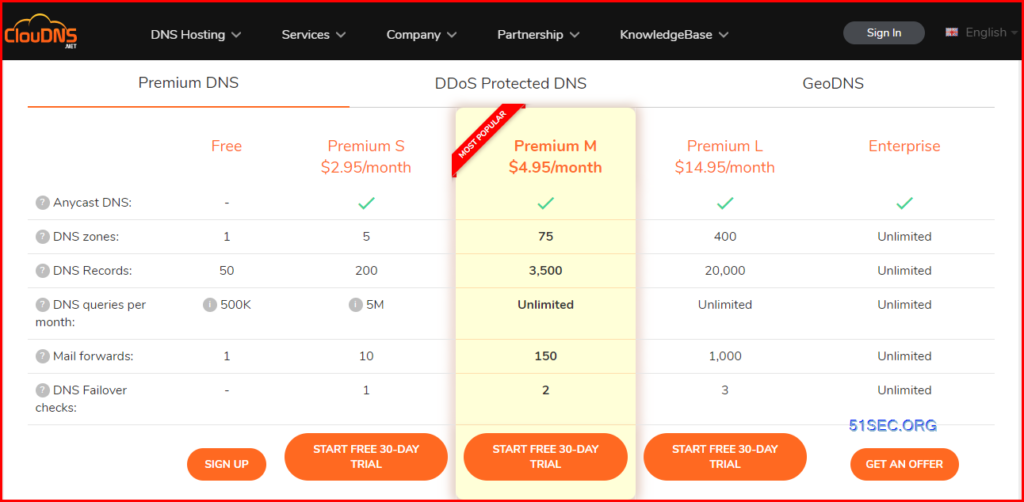
This post shows how you can get a free dns domain from cloudns.net and a google site as your website. And it also presents the steps how to integrate them together which make your Google Site to use custom domain you got from cloudns.net. 

1 Create zone – free zone

2 Choose your own domain name

3 Four NS records will be created after created your own free domain

4 Create / Manage your own record

+Add new record 

5 Verify it from https://dnschecker.org/

Create Your Own Google Site with Custom Domains


1 Publish your Google Site with default url, such as https://sites.google.com/view/51family

2 Click settings icon – > Custom domains

3 Add a new domain

For the first time, it will be asked to verify the domain’s ownership. 

Click continue:

You will be asked to add a new txt record for verification. 

4 Add Txt record then verify. 

It should be done in a minute. 

5 Add a new CNAME record into Cloudns.org domain

You will need to wait 10+ minutes for google site to adopt this domain change. 

1. Add a site into Cloudflare

2. Enable SSL/TLS Full Encryption

3. Verify Edge Certificate

By default, the edit certificate is not verified. We will need to add two TXT records in to verify them. 

Lets go back to Cloudns.net to add those two TXT records.

After you added those two TXT records, Cloudflare verified it then the certificate will become active and managed. 

4. Add A record in both CloudFlare and ClouDNS

Why we have to add both, that is because Free Zone has a limitation which say the records can be managed only from our interface. 

5. Once we added both records, the actual resolution is handled by Cloudfalre which can be verified by nslookup or dnscheck

If DNS resolved by ClouDNS, that will show actual A record ip address as show below


C:\Users\User>nslookup
Default Server:  UnKnown
Address:  192.168.2.8

> www.itpro.cloudns.org
Server:  UnKnown
Address:  192.168.2.8

Non-authoritative answer:
Name:    www.itpro.cloudns.org
Address:  1.2.3.4

>

But once DNS records resolved by Cloudfalre, it will show Cloudflare ip addresses. 

If there is an issue, check DNSSEC if has been enabled on Cloudflare. 

You will need to make sure that DNSSEC is enabled in Cloudflare and that you have created the matching DS record in your delegation at Cloudns.

Source link

Free DNS Hosting Provider ClouDNS to Integrate with Cloudflare and Google Site Read More »

[5 Mins Docker] Deploy Azure Naming Tool into Koyeb for Free

[5 Mins Docker] Deploy Azure Naming Tool into Koyeb for Free

This post is to show you how to create a your own free public available website for Azure Naming Tool Github project using Koyeb’s free service. 

It is simple, easy, fast and completely free. No credit card required. 


Azure Naming Tool 

The Azure Naming Tool was created to help administrators define and manage their naming conventions, while providing a simple interface for users to generate a compliant name. The tool was developed using a naming pattern based on Microsoft’s best practices. Once an administrator has defined the organizational components, users can use the tool to generate a name for the desired Azure resource.

Web GUI:

Github : https://github.com/mspnp/AzureNamingTool

Docker Image : docker.io/tfisicaro/aznamingtool

Demo site: https://aznamingtool.51sec.org/

Koyeb is a developer-friendly serverless platform to deploy apps globally. No-ops, servers, and infrastructure management. For side-projects, it is $0/month. Free account ,Koyeb is giving you $5.5/month free credit to use, which is enough for two Nano type apps, or one Micro type app. 

Price list:


NANO

MICRO

SMALL

MEDIUM

LARGE

XLARGE

CPU

1

1

1

2

4

8

RAM

256MB

512MB

1GB

2GB

4GB

8GB

DISK

2.5GB SSD

5GB SSD

10GB SSD

20GB SSD

40GB SSD

80GB SSD

PRICE

$2.7/mo

$5.4/mo

$10.7/mo

$21.4/mo

$42.9/mo

$85.7/mo

If you have Github account, you can log in with your Github account for free. But you do need provide a valid credit card to enable your free account to use. 

After you created and enabled your free account, you should be able to log in and start your Koyeb journey. 

1. Create an app

2.  Choose Docker

Enter docker image: docker.io/tfisicaro/aznamingtool

3. Choose nano type instance since Sshwifty is a very light application

4. Change default port 8000 to 80 , also, change your app name to something you can remember easily

Port 80

5. Click Deploy button then wait about 5 minutes to let system fully loaded

After 5 minutes:

Cloudflare setup:

Testing in Play With Docker


https://labs.play-with-docker.com/


$ sudo docker run -d -p 8081:80 docker.io/tfisicaro/aznamingtool
Unable to find image 'tfisicaro/aznamingtool:latest' locally
latest: Pulling from tfisicaro/aznamingtool
b5a0d5c14ba9: Pull complete 
4ece0626219d: Pull complete 
ccb4ba5bb726: Pull complete 
bdf2c62d9548: Pull complete 
d2e769e5b08a: Pull complete 
9606d1336b28: Pull complete 
4f4fb700ef54: Pull complete 
1ace93df5d16: Pull complete 
Digest: sha256:48ac1f663de64423ab00fd882c097538992c9ab6fe5bd15bf24ece35c1c0ce80
Status: Downloaded newer image for tfisicaro/aznamingtool:latest
51a6ad7591a77fc20f57eeba31193ce95a54af61c6ccf58b8a6e823749534960
[node1] (local) [email protected] ~
$ 

Copy: Ctrl+Insert 

Videos


Source link

[5 Mins Docker] Deploy Azure Naming Tool into Koyeb for Free Read More »

Devolutions RDM CyberArk Integration

Devolutions RDM CyberArk Integration

The purpose of the CyberArk Dashboard entry is to provide Remote Desktop Manager users with an interface that eliminates the need to use Password Vault Web Access (PVWA) to see the list of safes and credentials that the currently logged on user has access to. Combined with password-less scenarios and/or our rich role-based access control (RBAC), this means that a user does NOT need to know the CyberArk credentials to be presented with a list of accounts they have access to. Additionally, since the dashboard is meant to authenticate once to your server and, most importantly, maintain an active session for as long as it is active, it has the significant advantage of only requiring MFA once when you launch the dashboard.

Another design principle of the dashboard is that its main usage model is to go through the CyberArk Privileged Session Manager (PSM) to reach assets. This means that Remote Desktop Manager does NOT need to read the password for the account to be used. Less secure models are available to support older scenarios that some of our customers are still using.

How it is working

How it is working for Devolutions RDM integrating with CyberArk PAM solution:

Account brokering inserts credentials on the back end (by integrating with the privileged account management solution), which means that end-users never see credentials in the first place. However, they can still access the necessary accounts to complete their day-to-day work. Not only is this much more secure, but it is highly efficient as well. End users get their work done, and SysAdmins do not have to deal with numerous access-related requests. In addition, all actions performed in Remote Desktop Manager can be logged and reported for auditing and compliance purposes.

Below is an example diagram demonstrating how Remote Desktop Manager integrates with CyberArk’s PAM Solution

diagram

  1. The end-user attempts to access a privileged remote connection through RDM.
  2. RDM confirms that the end user’s certificate is valid.
  3. RDM connects to CyberArk and requests the necessary credentials.
  4. CyberArk accepts the request and sends the credentials to RDM.
  5. The credentials are used to grant the end-user access, so they can complete their work-related task.

At no point in this process does the end-user see the credentials!


Basic Devolutions RDM Operation

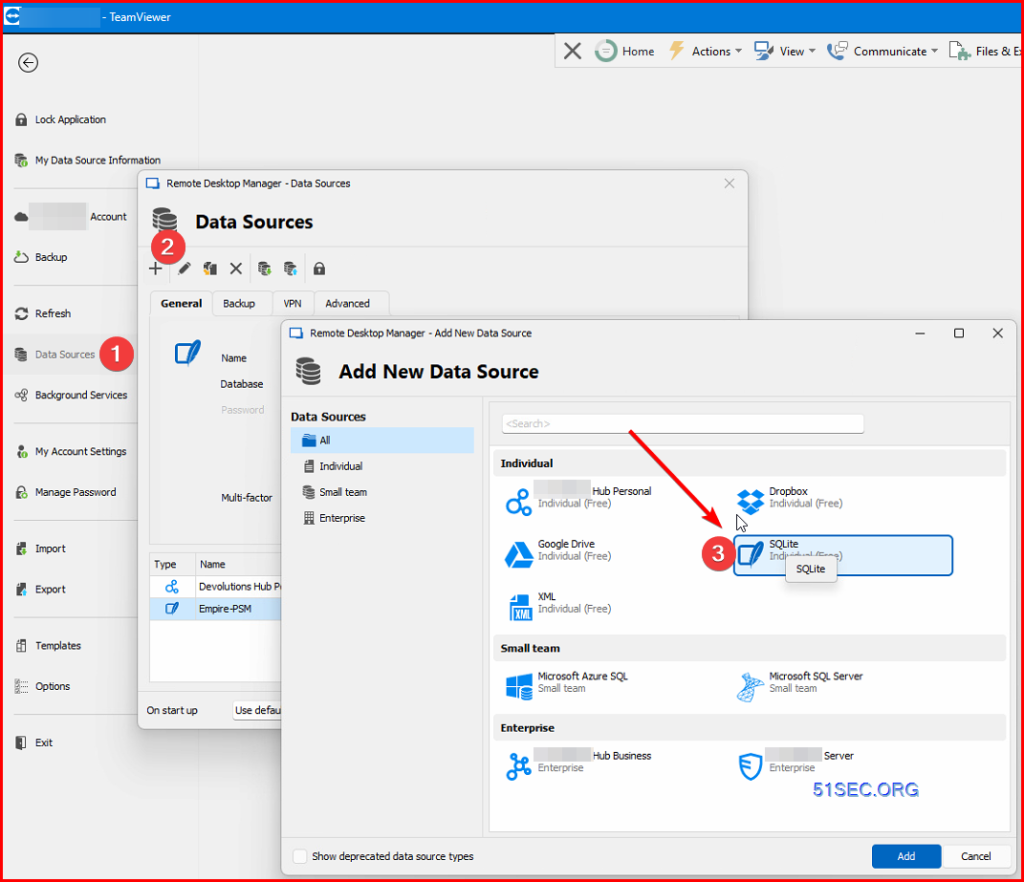
1. Add new data source

SQLite is local light DB usually for personal usage. 

SQLite db will be saved to folder at C:\Users\Netsec\Appdata\Local\Devolutions\RemoteDesktopManager

2. Add License

3. Two Licenses

  • One for RDM’s enterprise version license
  • Second is for CyberArk Dashboard Integration License

This is to use PSM /u /a /c string to create a session using PSM to connect to remote. 


192.168.2.25 is PSM server ip address.


Here is the magic string:

You will not need to grant following settings:
On the PSM server, no need to allow domain users to log on through RDS:

Devolutions RDM CyberArk Dashboard


Once you added the license, the hidden entey template for CyberArk will be available.

1. Select CyberArk Template

Session templates – CyberArk Dashboard 

Credential Mgmt Template

2. Use CyberArk Dashboard Template

Enter https://51sec.cyberark.cloud/privilegecloud as Web Services URL. 

Choose SAML as authentication mode

for self-hosted environment:

virtual directory will need to have / at the front

3. Advanced Settings

Override screen size for better embedding experience

No need to use PSM as connection

Synchronizer


Create a new entry for Synchronizer

GitHub Project for PSM Template

Steps

  1. Install RDM from Devolutions
  2. Start RDM and log in (either with a free account or an enterprise account)
  3. Import the template from this repo
  4. Create a folder if you want to group connections
  5. Add entry -> Add from template
  6. Select the template you imported in step 3 and replace information thats within brackets <>, including the brackets

The target account is defined as username@address, where the fields corrosponds with the fields in CyberArk.

New Template / Import Template

PSM-SSH or Other Remote APP


To get PSM-SSH session embedded into RDM Client, you will need to DisableRemoteApp function for the connector. Else, you will have to use “Open external” session. 

If DisableRemoteApp is not set to Yes, and not checked with option “Open externally”, PSM-SSH session will be automatically closed. 

$connection.ConnectUsingDashboardOnDoubleClick = “True”;$RDM.Save();

Video


Source link

Devolutions RDM CyberArk Integration Read More »

Qualys Agent Scan Steps and Generate Agent Scanning Report – Continuous scanning in the cloud

Qualys Agent Scan Steps and Generate Agent Scanning Report – Continuous scanning in the cloud

The agent sends up an upload of the baseline snapshot to the cloud agent platform for assessment. For the initial upload the agent collects comprehensive metadata about the target host (a few megabytes) and sends a baseline snapshot to the cloud for assessment. The status Scan Complete is reported upon success. This first scan typically takes 30 minutes to 2 hours using the default configuration – after that scans run instantly on the delta uploads (a few kilobytes each).

The asset data the agent collects includes many things for the baseline snapshot like network posture, OS, open ports, installed software, registry info, what patches are installed, environment variables, and metadata associated with files. The agent stores a snapshot on the agent host to quickly determine deltas to host metadata it collects.

What signatures are tested? Agent-based scanning uses the same signatures (vulnerabilities, compliance datapoints) as traditional scanning with Qualys scanners. 


Install Agent

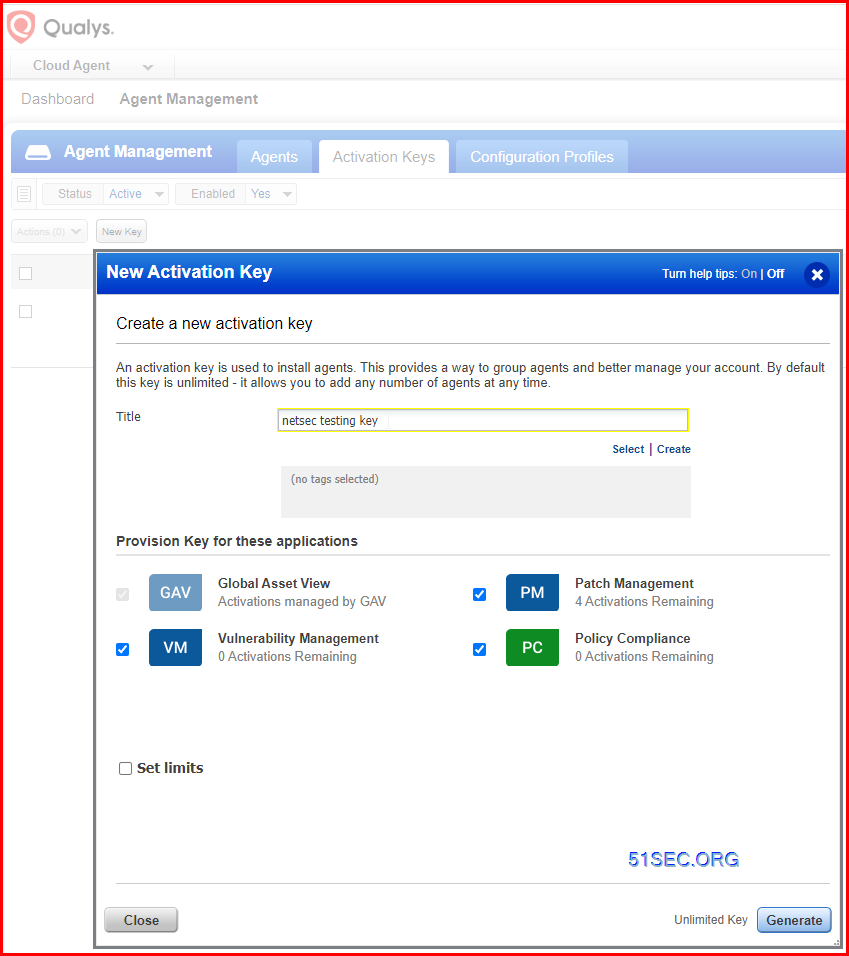
1. Create new key

2. Install Agents

Steps to Install the Linux Agent

Download the agent installer
File will be saved to your downloads area, as defined by your local system.

Copy QualysCloudAgent.rpm to the host you want to monitor and run commands. Click here to troubleshoot.

Copy and paste this command for installation (sudo access required):

sudo rpm -ivh QualysCloudAgent.rpm 

sudo /usr/local/qualys/cloud-agent/bin/qualys-cloud-agent.sh ActivationId=16beb165-1a29-4d238-80b9-5579d7810849 CustomerId=36ca3719-7f25-e45e-8243e-b1f1cc6b09e9 ServerUri=https://qagpublic.qg1.apps.qualys.ca/CloudAgent/

3. Verify Agents Installed Successful


Activate  Agent

On Demand Scan


Uninstall Cloud Agent /Deactivate Agent to Recycle Licenses


1. Uninstall Agent

2. Deactivate Agent

3. Manual Uninstall from host 

Windows Agent

Use Uninstall.exe. Learn more

Linux/Unix Agent (RPM)

Use this command:

"sudo rpm -e qualys-cloud-agent"  

Linux Agent (Debian)

Use this command:

"sudo dpkg --purge qualys-cloud-agent"

Report for Single Agent Using Tag

1. add tags

In case you did no create the tag, you can go to Asset Management to create one:

2. New Template Based Scan Report

3. Select Technical Report as template

4. Add tag into asset tags for filtering

4. Run report immediately or scheduling it for later

Reports for Cloud Agent Findings:

https://success.qualys.com/support/s/article/000003222

  1. Log in to Qualys.
  2. Select Vulnerability Management from the drop-down list.
  3. Click Reports > Templates> New> Scan Template. 
  4. On the Report Title tab, give a title to your template.
  5. Choose Host Targets. Please note that you’ll need to run the report on asset tags to get AGENT tracked hosts that are not in VM license, or add IP tracked entries in VM modules (as required) to generate reports on IP/All asset group. Check reporting on agent hosts and cloud agent hosts in asset search report for details.
  6. On the Findings tab, select the Asset Group, IP, or tags then scroll down to select Agent Data.
  7. On the Display tab, select the following:
  • Host Data
  • Text Summary
  • Vulnerability Details
  • Results
  • Appendix

 8. On the Filter tab under Vulnerability Filters, select the following under Status

9. Under State, select the following:

  • Confirmed Vulnerabilities: Active
  • Potential Vulnerabilities: Active
  • Information Gathered: Active

10. Select the Report Format as Portable Document Format (PDF).
11. Click Run.  

Source link

Qualys Agent Scan Steps and Generate Agent Scanning Report – Continuous scanning in the cloud Read More »

Configure Remote Connection RDP Tools (MSTSC, RDCM, MobaXterm, RDM) Integrate with PSM

Configure Remote Connection RDP Tools (MSTSC, RDCM, MobaXterm, RDM) Integrate with PSM

This post is to summarize the steps how to configure a remote connection manager tool to integrate with CyberArk PSM. In this way, you can directly RDP into target server through PSM, without logging into PVWA. Basically, this post gives you a way to launch transparent connections to target systems using a standard RDP client application.


Microsoft Remote Desktop Connection (MSTSC)

To use Microsoft standard RDP client, Microsoft Remote Desktop Connection (MSTSC), you will need to start a program with following command

  • psm /u {Priv_Account_Name}@51Sectest.dev /a {PSM_Server_Name} /c PSM-RDP

For example: 

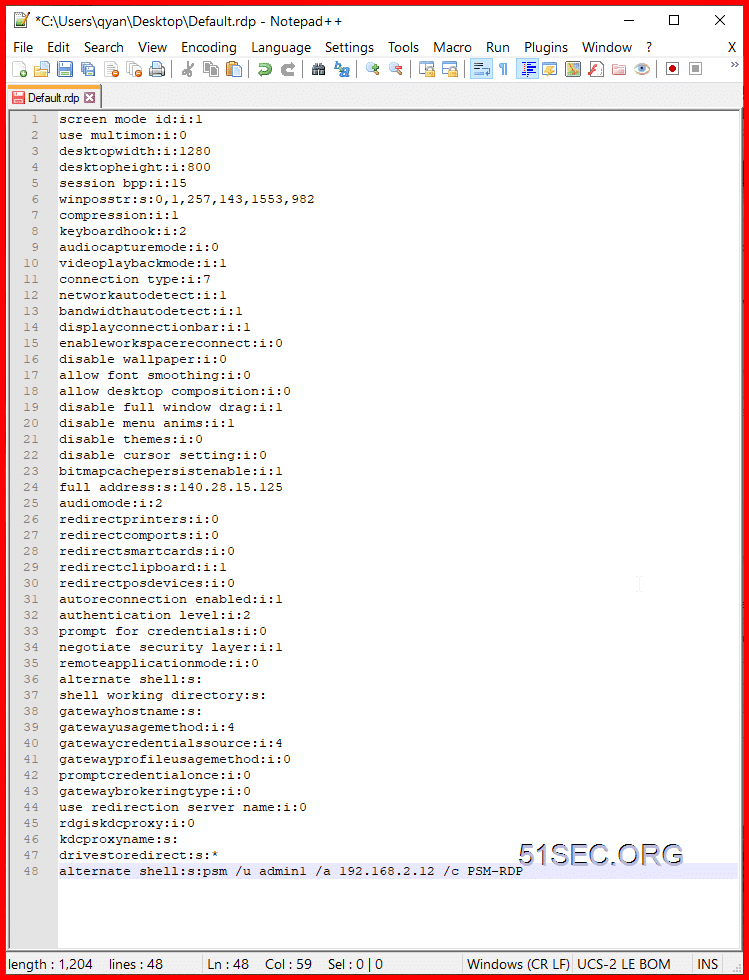
Windows 10 machines, Remote Desktop Connection might not have Program tab. Add the following line to the .rdp file: alternate shell:s:psm /u target-user /a target-address /c connection-component

Info: MSTSC has NLA enabled by default and the RDP connection will prompt a Windows Security window for authentication. To disable NLA when connecting with MSTSC, add the setting enablecredsspsupport:i:0 to one of the following files by editing the rdp file with notepad


Microsoft Remote Desktop Connection Manager

Microsoft has retired MRDCM software and following link is not having download anymore. There is some serious vulnerabilities found in this software, although it is still very popular Remote Desktop Connection Manager tool.

You can
download RDCM here: 
https://www.microsoft.com/en-gb/download/details.aspx?id=44989
 

Search by google and found this link to download : https://www.scom2k7.com/downloads/rdcman.msi
To integrate RDCM with CyberArk PSM, it requires some configuration changes on RDP file object. This post lists least step you will need to follow to get RDCM working with PSM. 

CyberArk KB: https://cyberark-customers.force.com/s/article/How-to-setup-Remote-Desktop-Connection-Manager

================================================

Title

Provide a short description of the article. The title appears in the article and in search results.

How to connect through Privileged Session Manager for Windows using Remote Desktop Connection Manager

Introduction

Remote Desktop Connection Manager (RDCM) does not have the ability to disable credsspsupport and therefore you will be asked for credentials before the connection to the PSM is established. When connecting with an LDAP user this does not matter as it be able to automatically authenticate with these domain credentials however you will not be able to make connections when using CyberArk and RADIUS challenge-response authentication as their credentials are different.

Step-By-Step Instructions

Ensure the following group policy parameters are applied to the PSM server.

  • Always prompt for password upon connection – Disabled 
  • Require secure RPC communication – Enabled (this should already be enabled as part of hardening. 
  • Require use of specific security layer for remote (RDP) connections – Enabled – Set to RDP. 


You should now be able to use RADIUS challenge-response and CyberArk authentication with RDCM.

===============================================================

1      Open Connection Manager application on your desktop and create an entry for the target device.

Give each entry a meaningful name to indicate the target device details.

2       Configure the Server Settings tab:
2.1.  
Populate the Server name field with the text {PSM-Server-Hostname}
2.2.  
Enter a friendly name of your
choice in the Display name field.
3        Configure the Connection Settings tab:

3.1.  
Uncheck the Inherit from parent checkbox.
3.2.  
Populate the Start program field with this string as
shown in the sample screenshot below:
psm /u {Priv_Account_Name}@51Sec-ITPROSEC /a {Server_Name}
/c PSM-RDP
              
               Substitute:
            {Priv_Account_Name} = The username
of the privileged account as defined in CyberArk; ie. MyUsernameAdmin
            {Server_Name} = The short name of
the destination server name as resolvable via DNS; ie. 
PrintServer

1   4   Configure the Logon Credentials tab as
shown in the sample screenshot below:

4.1.  
Uncheck the Inherit from parent checkbox
4.2.  
Enter your non-privileged AD account
username in the User name field
4.3.  
Enter the text 51Sec-ITPROSEC in the Domain
field

When you click to connect, you will enter the
password for your non-privileged AD account.


Notes: How to connect to RDP Console / admin mode:
If you choose connect to console / admin, PSM will deny the session.

PSM server will tell you “The requested session access is denied”.

  • Make a copy of the PSM-RDP connection component (lets call it PSM-RDP-ADMIN).

  • Set the “AlloweConnectToConsole” Value=Yes, Visible=Yes.

  • Add it to the desired platform

  • In RDP client where you specify the psm /u etc.. commands, change the /c to PSM-RDP-ADMIN

There is no “admin connect” in current version of MS-Windows after server 2003:

For 2003 or Windows XP you would need a custom connection component with mstc.exe /admin or mstc.exe /console as the command.


MobaXterm

MobaXterm also support PSM well. Here are all configuration steps in the screenshot. 


Most important step is to configure Remote command “psm /u [email protected] /a 192.168.2.12 /c PSM-RDP


Create a domain user account and save it into credential list. 


mRemoteNG

So far, not find a good way to support remote command to launch “psm /u [email protected] /a 192.168.2.12 /c PSM-RDP” after RDP logged in PSM .


Remote Desktop Manager Free Edition – Devolutions

How it is working for Devolutions RDM integrating with CyberArk PAM solution:

Account brokering inserts credentials on the back end (by integrating with the privileged account management solution), which means that end-users never see credentials in the first place. However, they can still access the necessary accounts to complete their day-to-day work. Not only is this much more secure, but it is highly efficient as well. End users get their work done, and SysAdmins do not have to deal with numerous access-related requests. In addition, all actions performed in Remote Desktop Manager can be logged and reported for auditing and compliance purposes.

Below is an example diagram demonstrating how Remote Desktop Manager integrates with CyberArk’s PAM Solution

diagram

  1. The end-user attempts to access a privileged remote connection through RDM.
  2. RDM confirms that the end user’s certificate is valid.
  3. RDM connects to CyberArk and requests the necessary credentials.
  4. CyberArk accepts the request and sends the credentials to RDM.
  5. The credentials are used to grant the end-user access, so they can complete their work-related task.

At no point in this process does the end-user see the credentials!

PSM Integration

192.168.2.25 is PSM server ip address.


Here is the magic string:

Source link

Configure Remote Connection RDP Tools (MSTSC, RDCM, MobaXterm, RDM) Integrate with PSM Read More »

[5 Mins Docker] Create Your Own 80s-90s DOS Gaming Website (1898 Games)

[5 Mins Docker] Create Your Own 80s-90s DOS Gaming Website (1898 Games)

There are lots of Chinese DOS games in 1980s – 1990s. The Github page (https://github.com/rwv/chinese-dos-games)  collected them and created a docker image to simplify the steps to bring them up into a website. You even can create your own website with just a couple of simple commands. 

In this post, I am going to go through those steps in 5 minutes and show you how simple it is. 

Demo site: https://dos.lol/

Screenshots

Installation Steps in Docker Playground

$ virt-what

hyperv

docker

$ sudo apk update
fetch https://dl-cdn.alpinelinux.org/alpine/v3.16/main/x86_64/APKINDEX.tar.gz
fetch https://dl-cdn.alpinelinux.org/alpine/v3.16/community/x86_64/APKINDEX.tar.gz
v3.16.2-203-g16a4499ea3 [https://dl-cdn.alpinelinux.org/alpine/v3.16/main]
v3.16.2-202-ge26245aea1 [https://dl-cdn.alpinelinux.org/alpine/v3.16/community]
OK: 17053 distinct packages available
[node1] (local) [email protected] ~
$ sudo apk add git
OK: 395 MiB in 156 packages
[node1] (local) [email protected] ~
$ git --version
git version 2.36.2
[node1] (local) [email protected] ~
$ 

Note: If you are using PWD (Play with docker), the copy shortcut key is ctrl+insert, paste is ctrl+shift+v or ctrl+insert.


###############################################################
#                          WARNING!!!!                        #
# This is a sandbox environment. Using personal credentials   #
# is HIGHLY! discouraged. Any consequences of doing so are    #
# completely the user's responsibilites.                      #
#                                                             #
# The PWD team.                                               #
###############################################################
[node1] (local) [email protected] ~
$ df -m
Filesystem           1M-blocks      Used Available Use% Mounted on
overlay                  10240         0     10240   0% /
tmpfs                       64         0        64   0% /dev

[node1] (local) [email protected] ~

We got 10G to play in this Docker Playground. 

1 Create installation folder:


2 Create Own Security Policies

The all games will be about 36G. It will be too big for a docker image. 

So there are two different ways to install it.

Method 1: using default docker image which only has about 40 games. The docker image size is about 600MB. 

The docker compose file is:


Once done, you can type “docker compose up -d” to bring it up. 

Here are all games:

游戏列表

Of course, if you don’t like docker compose file, you can use following one command to bring this game docker up :

docker run -d --name dosgame -p 8090:262 oldiy/dosgame-web-docker:latest

3 Method 2 : Install all games.

If your spare hard drive size is more than 36G, then you can try to install all 1989 games by downloading them.

The docker compose file will be:

You will need to manually download the game using following commands:

If there is no python or git, you might also need to run following commands to install them:

  • apt update -y
  • apt install git -y && apt install python3 -y

4  Check game files

After completed download, you can check file numbers using this command:


The total number should be 1898

You also can use du command to check:


Check total file size. It should be 36G:


5  Bring up the game


or

Installation Pre-requirements

Free resources you might need to complete this docker project:

Pre-installed services:

  • Docker, 
    • apt update
    • apt install docker.io
    • apt install docker-compose
    • apt upgrade docker.io
    • mkdir /root/data/docker_data/<docker_name>
  • Docker-Compose (Using Ubuntu OS for the commands)
    • Docker-compose down
    • Optional command : use following command to backup your Docker data. You might need to change your folder name based on your docker configuraiton
      • cp -r /root/data/docker_data/<docker_name> /root/data/docker_data_backup/<docker_name>
    • docker-compose pull
    • docker-compose up -d
    • docker image prune

  • Portainer (Optional)
    • docker volume create portainer_data
    • docker run -d -p 9000:9000 –name portainer –restart always -v /var/run/docker.sock:/var/run/docker.sock -v portainer_data:/data portainer/portainer-ce:latest
  • Install some applications: apt install wget curl sudo vim git (Optional)
  • aapanel with Nginx (Optional)
  • Nginx Proxy Manager (Optional)
  • Install screen (Optional)
    • Install screen (Depends on the Linux Distribution if it came pre installed or not) : yum install screen
    • Initiate a Screen : screen or  screen -S <screen name> <command to execute>
    • Detach from the screen : “CTRL+A,D” not “CTRL+A+D”
    • List all the screen currently working : screen -ls
    • Reattach to a screen : screen  -r  <session number> or screen -r <screen name>
    • Kill specific screen: screen -X -S <screen name> quit
    • Kill all screens : pkill screen

Install it from GCP Free VPS


1  Create VPS

2  Install Docker & Docker Compose

3  Install required system services and applications

4  Docker Compose file or Docker Run


docker run -d --name dosgame -p 8090:262 oldiy/dosgame-web-docker:latest

5  Download All games (Optional)

docker run -d --name dosgame -p 8090:262 -v /docker_data/dosgame/games:/app/static/games oldiy/dosgame-web-docker:latest

6  Bring docker up 

Videos


Source link

[5 Mins Docker] Create Your Own 80s-90s DOS Gaming Website (1898 Games) Read More »

Scroll to Top